Thursday, March 31, 2011

Bub- Pages In Time Sketch of the Week


Here's DS1 not yet a year old in Milan in front of Castello Sforzesco. "Bub" is my father's nickname for my son.

This was done for the PAGES IN TIME weekly sketch challenge. Come add you own version of the sketch here. Karen updates her blog weekly with the latest sketch so pop over to her blog to check out the sketch here.

This is also a part of the PAGES IN TIME discussion group "Extreme Craft Make-Over." This is a group for crafters of all abilities levels to join and discuss an area they would like to improve. This month my personal area of improvement will be focal point. Come join us.

I also wanted to show how I made the title:
1. I covered letters (I cut from styryfoam) with drywall plaster. It goes on pinkish but dries white.

2. I painted the letters in copper penny. When that paint was dry, I painted over the copper with blue but sponged off the some of the blue to reveal the copper under the blue.

Monday, March 28, 2011

March Counterfeit Kit Blog Hop

Here we go HOP again. It's that time of the month. The good time of the month for the Counterfeit Kit Challenge blog hop. You should have arrived her from Marlynn - if not you might want to start at the beginning at the Counterfeit Kit Site.

Again another incredible month of inspiration and fun playing with my knock off kit. Like I said before, I believe the Counterfeit Kit is better than any kit club you could subscribe to because you build your personalized kit with the supplies you already have on hand; those things you obviously liked enough to individual pick out in a store. This month our "kits" were inspired by Studio Calico.

This blog hop challenge was to scraplift ourselves. We all love to lift especially when we need inspiration. It's also fun and easy to lift yourself because you've made the page before so you have experience plus you know what challenges you may have had the first time and could determine a way to avoid those same challenges.

My lift started as a process. First it was a lift originally from the mega-talented Irene Tan AKA "Scrapperlicious" She's on my list of blogs I worship .... I mean follow. She made a layout called "Guilty?" and basic explained piece by piece how to make the page begging me to lift it. I did last month on a layout called "Surreal." I decided to lift this page and I used my March Counterfeit Kit to do it, so I made a layout called "HUSH Little Baby."

AND

I became so wrapped in the spirit of lifting I decided to use this layout as a bases for my (like) first ever card. This was meant to be a mini-version of the layout so it to was a lift.

This card was inspired by the gals at A Creative Operation. This is the Quad pocket card they described. I decided I would make these for all my card needs since we're a family of four and each member can put a personalized note on their individual tag.

The picture and quote are from a left over daily calendar and I can not remember the photographers name. So if you recognize her work, please let me know her name so i can give the proper credit here. I've been holding on to pieces from this calendar for years now and just the other day realized they are perfect for cards.

Of course I used my favorite elegant flowers and my new favorite soda can butterflies with beads.

Besides cardstock, paint, glimmer mist and stickles, I had to dig out one non-kit item the ribbon and trim. All the ribbon and trim I laid out dealt with Easter. I never pulled ribbon and stuff for the orange part of my kit. The net like trim is actually Christmas ribbon.

I wanted to include an orange in the flourish and as bling but I do not own orange stickle or dimension paint, but I do have Metalic Mango nail polish and that is exactly what I used.

I am so happy I found this challenge. Thanks to this challenge I have completed 4 - 8x8 pages in under a month. Plus I have finished 4- 5x5 pages for a friend's paper bag album and the 1 card.

Here are a few of my other pages created with this kit:


Enjoy the rest of the blog hop. Ang is waiting on you next. If you don't already participate in the challenge come back April 5th when they reveal which kit were forge next.

Thursday, March 24, 2011

Spring Reading Thing 2011

I'd like to get through several books this year, but I needed ideas on what to read. Some people have a made a few suggestions and I'm always open to more ideas. I found this reading challenge called the Spring Reading Thing 2011 and thought not only will this motivate me but it may also inspire me to find more books to read.

I plan to read:
Children are from Heaven by John Gray
Little Women
Water for Elephants
The Thirteenth Tale
Almost Moon and The Lovely Bones by Alice Sebold

additions:
Prison of Birth
Heaven is For Real

Sunday, March 20, 2011

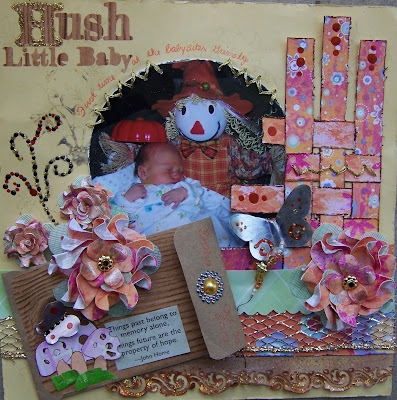
Hush Little Baby ~~ Counterfeit Kit Layout 3


This page is a lift from the mega-talented Irene Tan AKA "Scrapperlicious" She's on my list of blogs I worship .... I mean follow. She made a layout called "Guilty?" and basic explained piece by piece how to make the page begging me to lift it.


Thursday, March 17, 2011

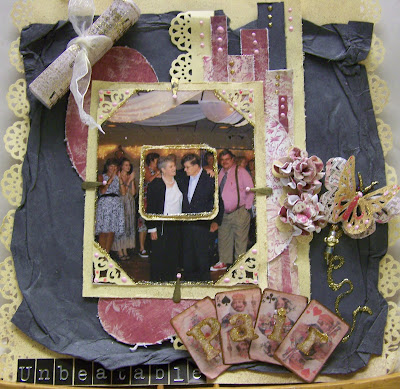
Unbeatable Pair ~~ Pages In Time DT Challenge

This is a layout dedicated in loving memory of my Great Uncle Jim.


This is a picture of him and my Aunt Rosemary at my cousin Allen's wedding. They called for the couple married the longest, and as you can guess, with 70 plus years of marriage they were an "Unbeatable Pair."

This layout is based on the Thursday's Sketch of the week for Pages in Time. Karen from Pages in Time also challenged us to use these vintage playing cards on a page.


That was a challenge! I knew I had to make a page of my Uncle Jim next and I only had modern pictures that didn't seem to fit the cards, but I made them work. I used my remaining scraps from my February Counterfeit Kit. Maybe you might not have noticed, but I found it easier to use February's Kit than my March Kit.

This scroll is sheet music from my son's first band concert covered in glimmer mist and sparkles. The ribbon is remains from a Christmas gift bag. If you unravel the scroll, I included journaling about my Uncle Jim and Aunt Rosemary. I discovered my love of Die-Cut with a View papers. They are so pretty and easy to distress and manipulate.


These are my favorite flowers to make: elegant ruffles flowers. I also included another of my favorite embellishments a butterfly made with my Martha Stewart Punch. Again showing how great DCW papers are to use. With my new EK edge punch, I punched the sides of this layout.


And another look at the vintage card title. You can also see how I water distressed this page.


Family

"Family"


This is another picture from Easter of 2000. The journaling says: Sometimes the word “army” comes before the word “family.” When stationed in Italy, we redefined the word family to include our “ARMY FAMILY.” The envelope contains a note detailing the people in the picture and our “army family” as a whole. This is my Counterfeit Kit with the left over mask from last month’s kit. I also made the butterfly from a soda can based on some items for sale at ETSY. Check out these butterfly and also teddy bear from cans.


Owl Chippie Details


I showed this page off already, but I wanted to break down the steps I used on the chipboard owl. Both techniques are from Lisa at Swirlydoos, so for better details and a how-to check out her awesome blog. I follow her blog "A Random on Purpose Life."


First I inked and painted the chippie. The owl looks like it is camouflage-colored here which would have been cool to stop at this point.


I covered the owl in blue tissue paper by applying it with mod-podge.

Next I applied a little gold paint as an accent.


The middle layer is torn pieces of paper again attached with mod-podge.

Do It Yourself Kits


DIRECTIONS FOR THE “Do It Yourself” KIT I SENT TO THOSE THAT PLAYED IN THE JANUARY PROGRESSIVE.

The kits include materials to make a corset, elegant ruffled flower, and 3-D butterflies.


To earn a chance of winner your own kit or to get other cool RAKs come play in the progressive challenge. On March 26 we will play a live round, but in the mean time players can make layouts, practice progressive challenge skills, earn points, chat and have fun.


3-D butterflies-

STEP 1- Trace a butterfly onto paper of your choice. Ink or chalk to your taste or not.

STEP 2- Attach a punched butterfly to your traced butterfly along the center and spread the wings up.

STEP 3- Bedazzle your top butterfly. I used one of the transparency punched butterflies as the top layer. I covered this butterfly in glitter glue and added a few drops of pink dimension paint.


STEP 4- Glue the center of the third layer to the second layer. Spread the wings apart.

Corset-

The kit includes the origami folded corset.

NOTE- You can add real lace or used the edge punch lace in the kit.

To round the brassiere region- (optional) –

1. Pinch one of the diamond flap towards the center to make an even oval top.

2. Fold the corset in half so that you can cut the other side of the brassiere even to match the already cut side.

3. Pinch the top of one side the brassiere region down to the bottom so that you can round off the bottom even to the top.

To add lace using the edge punch

1. Cut a small region of the edge punch that will fit on the bottom leg of one of the corset. Repeat this step for the other leg.

2. Cut another small region of the edge punch for the brassiere region.

Add embellishments:

1. Cut small slivers of paper (blue here) and crisscrossed them up front like a lace-up.

2. Take a longer sliver and cross it to make it look like a bow.

3. Longer slivers are used down the leg and sometimes a long sliver from under the brassiere, down the stomach, and to the point adds a nice touch

4. Cover the corset in glittery glue.

Elegant Ruffled Flowers

Here's a tutorial for the elegant ruffled flowers.

Here's an option for the white flowers in the kit to make them the perfect color: colorwashing tutorial.