Need motivation to get layouts completed? Come play Build It and Bring It Bingo with me Scrapbook.com
http://www.scrapbook.com/forums/showtopic.php?fid/18/tid/1519287/pid/11684935/post/11684935/#11684935I will call random squares every Monday and Friday.
This is a betting/swapping challenge. So all players must be willing to fork over a scrap item if they lose. I will simply PM the winner's address to those that owe the winner, but please do not hold me responsible for the collection of prizes. Also please respect the winner and mail whatever you promise to the winner... no flaking!!!
THE RULES:
*Your lo has to be new as of Nov. 15 of this year it can be used for other challenges. In fact I tried to make squares related to common challenges.
**Upload your lo at sb.com only AFTER the square has been called or whenever you get the square completed.
***Squares cannot be combined but two page layouts can count towards 2 different squares
****The squares will be called on Monday and Friday. I will update the front page, the title, and post within the thread at sb.com when a new square is called.
****When the challenge has been closed, I will PM the address of one of the winners to you so that you can mail the prize.
****** I will also PM the address of the blackout winner to those that want to play the bonus round.
*******You can win only ONE round, but even the winners can play for the blackout round
Be sure to share your layouts as you complete them and if you can find a few extra minutes leave love. I know you’ll want to rush and get these layouts done and won’t have much time for love, but please share it and spread it.
You will select NINE scrap items/techniques from the list and place them on a piece of paper divided into nine squares. Feel free to place the techniques any where on your square. After you have made the card, snap a picture, post it here as a reply and be sure to public embed it so I can move it to the front page.
Here's my example and card:

Here's the items:
1. Stickles or glitter
2. paper piecing
3. handmade flower
4. handmade embellishment
5. metal object
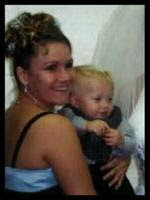
6. family picture
7. friend picture
8. Non scrap item
9. 4 plus layers list the layers
10. masking
11. stitching
12. Ribbon
13. tag
14. Distress
15. Something new